

Beginners Guide To Designing Apps
Part I
The beginner's advanced guide to building an app
![]()
― Plato, The Republic
The most important part of building low cost/high-quality web, mobile and desktop applications is meticulously defining what you will build. Part I of this series will show you how to map out what you will create. The remaining parts of the guide will then walk you through the rest of process until you have an application that is ready for launch.
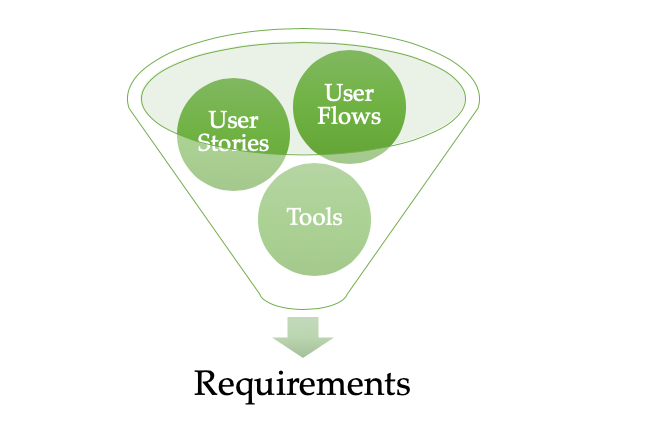
The formal and comprehensive method of defining what an app will do is called requirements engineering, and is made up of :
- Elicitation: gathering all the wants and needs of an app
- Analysis: reviewing each want or need for feasibility, estimation and valuation
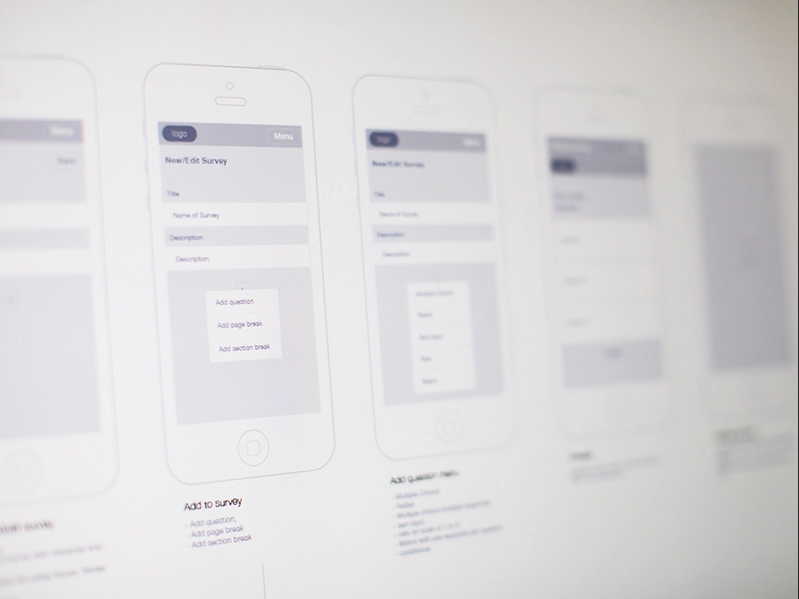
- Modeling: making low tech and high tech prototypes of the app
- Validation: ensuring the model is consistent with the analysis and elicitation
- Management: documenting and maintaining all of the above
If you're buildin g software to help pilots land planes, you might follow some strict standards in all 5 of the above tasks. However, for general or business applications, we bring those activities down to two: creating User Flows and turning them into User Stories. We use different tools to draw our user flow diagrams and document our user stories.
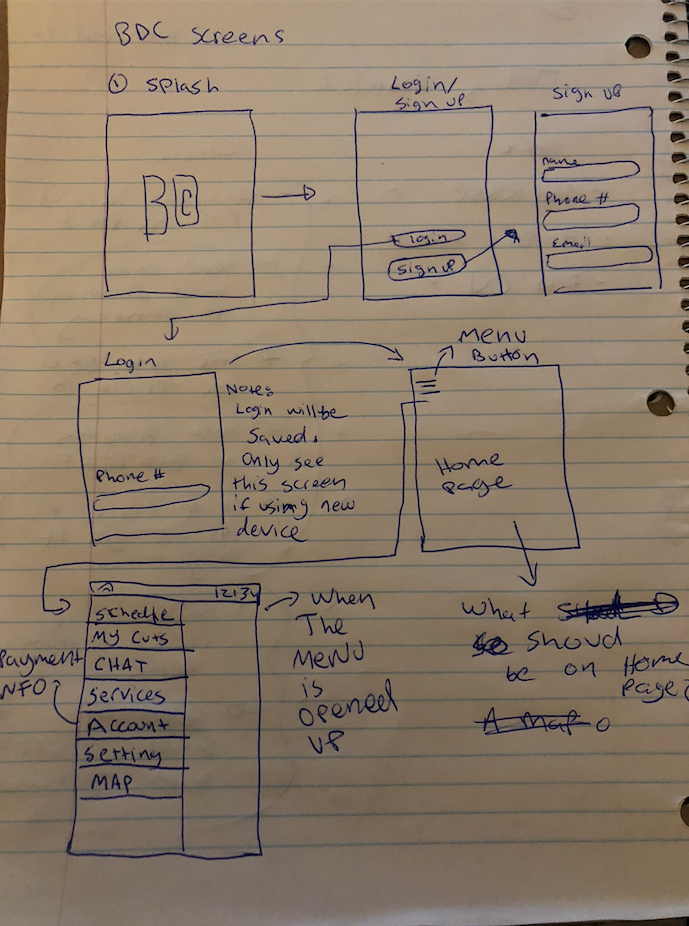
User Flows
The first step to gathering the requirements is to walk through the app as the end user — by creating a user flow diagram. There are so many ways to create user flow diagrams, some simple, some complex. We like keep it simple, and just draw our user flow diagrams with pen and paper.
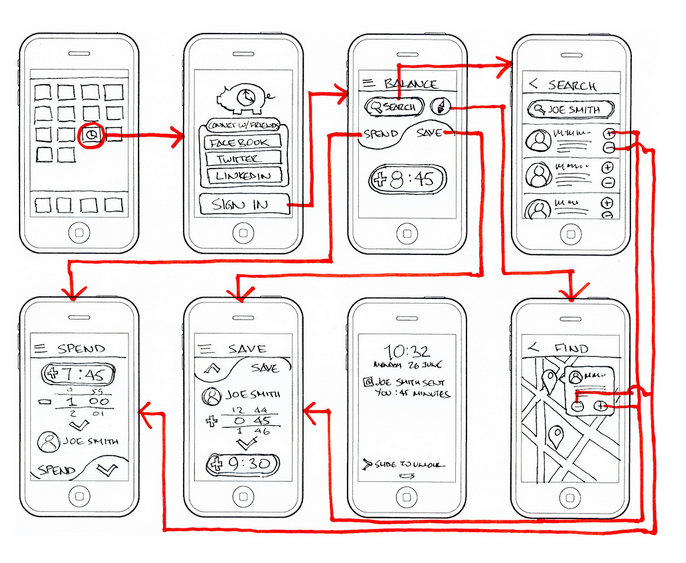
We find documenting our user flow like this gives us two benefits:
- create a rough design that gets us to start thinking about layout, and
- determine the journey the end user takes through the app.
This allows us to switch up designs easier as we add more detail in later rounds. It also helps us focus resources on building the critical features to launch the MVP (minimum viable product).
To make sure we cover the important journeys, we draw our diagrams from the perspective of different types of users. For this app, we have two main types of users:
- New customers
- Repeat Customers
The goal here is not to get every possible view. For example, if you draw a gear icon for settings on the home page, you can draw the settings page's layout, but don't write out each individual setting. This is just the high level journey that will help you come up with the user stories for the MVP (minimum viable product).
User Stories
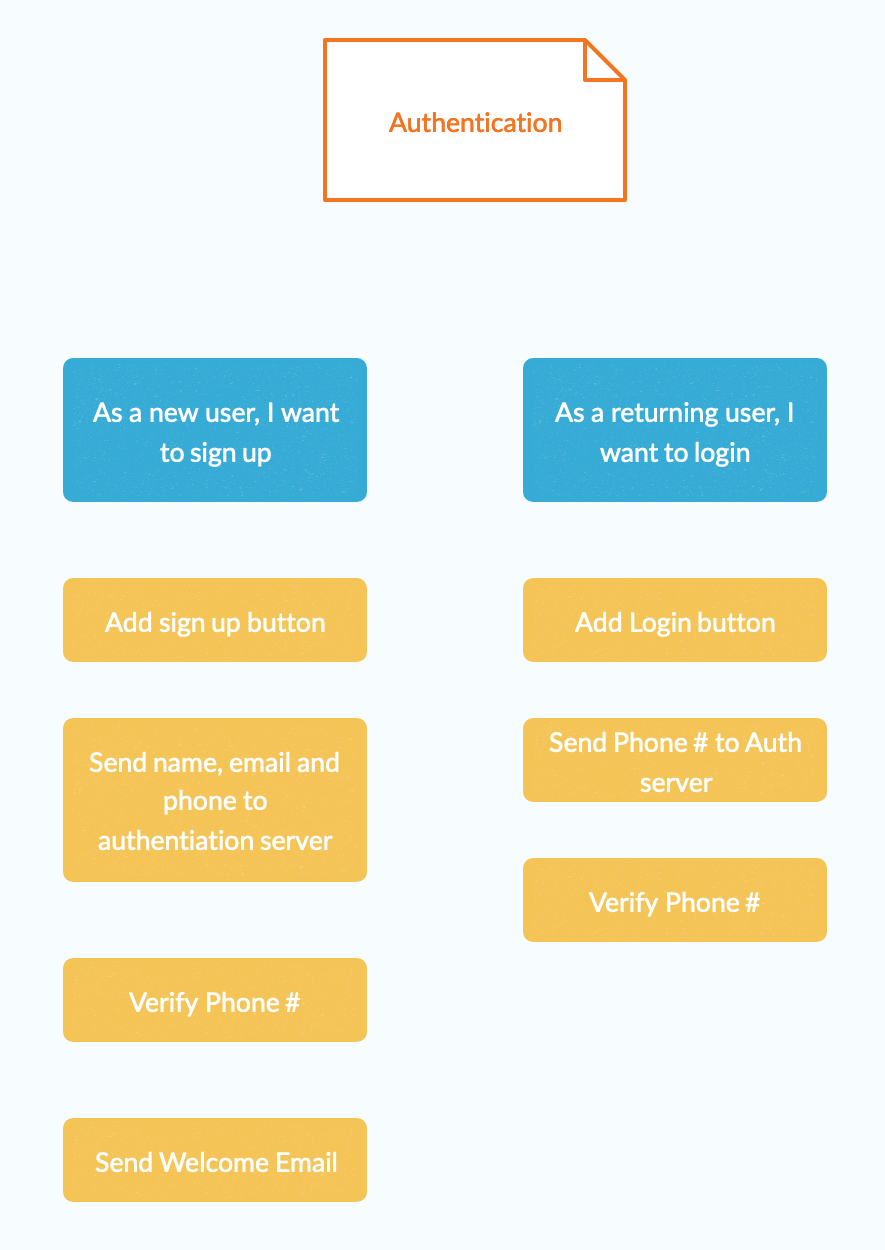
A User Story is an informal way to describe a software feature. It tells the 'story' of a specific feature from the perspective of the person using it. Here is an example of a user story from the user flow diagram:
- As a returning user, I want to login
- As a new user, I want to sign up
Using this format helps us break down entire applications into groups of smaller features. Each week, we build a few features, until eventually all the features are completed, tested and ready to be released.
Once released, we continue this cycle, delivering updates and other enhancements. It's agile because we can prioritize or de prioritize features on a weekly or biweekly basis. Initially, we group stories into :
- features we need to launch (MVP),
- features to launch for Phase II (enhancements after the MVP), and
- the stories that are 'nice to have', that can be circled back to in future releases.
For a small app, you might come up with 20 - 30 stories. For a larger project, you could reach a hundred or more.
So we need a better way to sort all these stories. We'll do that by:
- Writing good User Stories
- Categorizing the User Stories
- Tracking the User Stories until 'Done'
Writing User Stories
The first step is to write good user stories; this makes their categorization and tracking easier. To write good user stories, we use the 'INVEST' method.
Until you get the hang of writing user stories, you can confirm each story fits the criteria below.
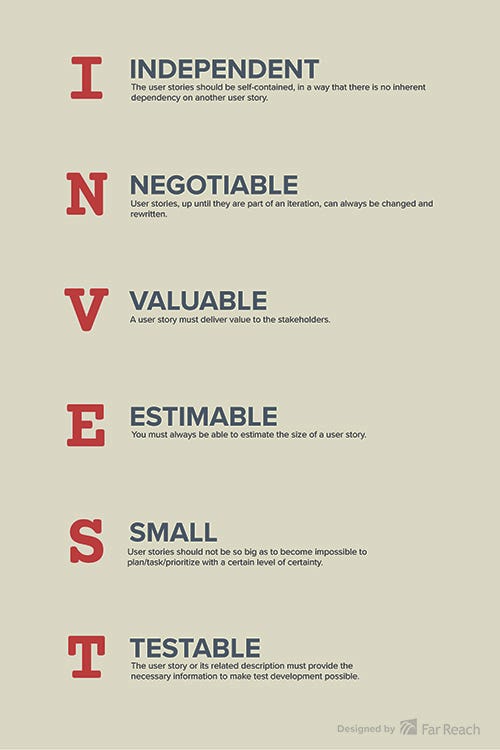
Independent
✅ As a new user I want to sign up
An independent story is not tied to other stories. The 'sign up' feature can be built first thing, in the middle, or the end of the project. It doesn't depend on any other story being completed, and vice versa. It does have relationships with other stories, such as logging in. But you can build the login functionality before the sign up functionality if you really wanted to.
❌ As a new user, I want to sign up and view available services
This story on the other hand, forces two separate parts of the system, authentication and services, to be developed together. That creates an unnecessary coupling, and can be split into two or more independent stories.
Negotiable
✅ As a customer, I would like to see available dates.
A user story is not a contract, but more of an invitation to conversation and collaboration. It captures what needs to be done, not how. For example, a user who is booking an appointment would want to see available times, but how this is done is left up for discussion when the time arrives to work on it.
❌ As a customer, I want to be able to get a popup of available dates.
By saying it has to be a popup, that creates a contract for the developer to abide by. Now that you've told the developer how to do something, later you may notice that in fact, popups are annoying and unnecessary for this feature. It can be displayed right under the date. Leave the details out, and just focus on the action or journey the user is taking.
Valuable
❌ As a user, I want to update my profile pic.
A user story should reflect something important. One of the stories we ultimately ended up ditching for the MVP was adding a profile pic. For an appointment booking app, the user will be the only one to see their own profile so it was not important for the first version. It added no value , but took away time from developing more important features identified in our user flows. It was added to the 'Nice to have' pile in case it made sense later.
Estimable
✅ As a customer, I want to see available openings by date
We prefer to have our stories take 5–10 hours to develop. This story was originally estimated in our project for 5 hours and was done in 3. Estimates get more accurate the more stories you complete as you learn how fast you are capable of going. If we cannot assign an estimate, we break down the story into simpler tasks or make it clearer.
Small
❌ As a customer, I want to book an appointment
Just by looking at that story, it's obvious this will take much longer than 10 hours. The booking system can be complex, so we break them down into smaller features, that can be tested on their own, such as:
- As a new user, I want to view available services
- As a returning customer, I want to see available times
- As a customer, I want to update my booked appointments
Testable
✅ As a customer, I want to be able to see available openings by date.
To ensure we could appropriately mark each story as 'Done' once it's developed, they need to be testable. For each story, we attach 'Acceptance Criteria', and the developer writes automated tests to ensure it always does what's expected. If these criteria are met, we would consider a feature tested and Done.
Sample Acceptance Criteria for this story could be:
- Selecting a valid date returns appointment times
- Appointment times returned are actually available (I.e. not booked by someone else or blocked off)
- Appointment times are within the business hours
❌ As a customer, I want to know where to tap to get available openings
We can't write a user story that will place us in the mind of a customer. You can never know what the customer knows, so this would be something handled through the UI/UX design of the app (upcoming blog post).
Categorizing User Stories
Once we've written our user stories we need to group them nicely, like this:
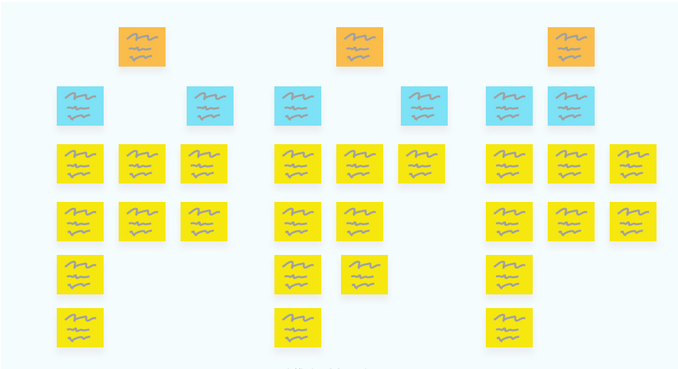
At the top of the hierarchy are Epics. An Epic is just a set of related User Stories. The login and sign up flows can be combined into an Epic called "Authentication Flow". The appointment booking service can be its own Epic. This helps us keep our sticky note situation from getting sticky.
The blue sticky notes are the user stories. Each story would have sub-tasks (the yellow sticky notes). Sub-tasks are the granular tasks that are worked on by the developers. Completing all sub-tasks completes the user story. Below is an example of how the Authentication Epic is broken down in our project.
We generally don't create the sub-tasks right away after coming up with our stories. The requirements always changes as you build out features; some things are de-prioritized, and others dropped altogether.
Also, if you're a small team or an individual, and you're working on a large app, it's best to break it down into 2–3 modules and develop one module at a time.
Tracking User Stories
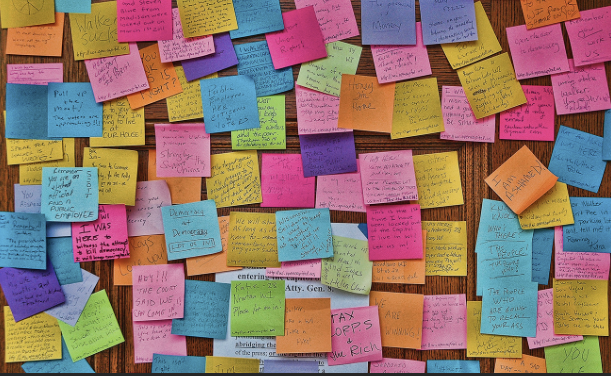
We used Trello to manage our user stories. Trello was simple enough that it mimicked virtual post-it notes but powerful enough that you could add acceptance criteria, estimates, due dates, attachments and more right onto each card. Also, it was a great way for clients and developers to communicate and provide live two-way feedback if necessary. To track what was started, what is being worked on and what had been done, we use a method called Kanban.
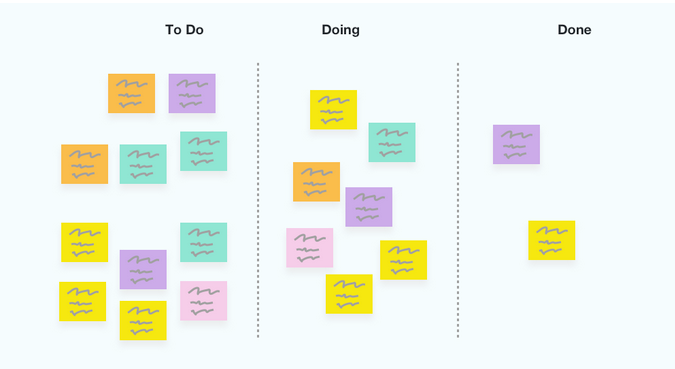
The user stories are split into groups.There are a few ways to do this, but at Gessic, we use the following categories to track our user stories:

Backlog
This is where all our user stories go. At the beginning of each week, we review what stories we plan to work on, give them some estimates, and move them to the to-do section.
To Do
These are the stories that we plan to complete during the week. If there are any questions on how to proceed, it can be left on the card for other team members or the client
Doing
These are stories which are underway and assigned to a developer. Once it complete, and all the test cases pass, it is moved to 'Done' Pile.
Done
The acceptance criteria is accepted by the team or the client, and test cases have passed. These test cases should be automated so that as further stories are marked as 'Done', they do not inadvertently cause bugs in already completed stories.

Beginners Guide To Designing Apps
Source: https://uxdesign.cc/break-it-down-or-the-making-of-an-app-part-i-b2f260c2dffb
Posted by: masonpate1995.blogspot.com
0 Response to "Beginners Guide To Designing Apps"
Post a Comment